Showing posts with label biology. Show all posts

Monday, November 9, 2015

Photosynthesis and Respiration

This is a great unit with my seventh graders.  It's easy to start because the kids usually remember something about photosynthesis from elementary school.  If not, they already know that plants need sunlight and water.  This is not a very long unit.  Maybe 2-3 weeks.

The goals for this unit are:
  • The students will be able to write the word equations for photosynthesis and respiration
    • Photosynthesis is
      "sunlight + water + carbon dioxide --> glucose + oxygen."  
    • Respiration is
      "glucose + oxygen --> ATP energy + water + carbon dioxide."
  • The students will identify that photosynthesis occurs in the chloroplast and respiration occurs in the mitochondria
  • The students will identify that they are reverse/opposite reactions.
  • The students will understand the words "reactant" and "product."
  • The students will use their knowledge of the reactions to answer various questions.
Some (not all) of the activities we do for this unit:

1. Acting it out!

I have little cut outs from card stock paper (nothing fancy!) and one kid is assigned a role (either a reactant or a product, or the plant).  I make up a little narrative and the kids have to listen for their part and come in and "act" it out appropriately.  It's just a fun little activity, but it gets the kids up and moving and helps them visualize what's going on.

This class actually happened on Halloween this year, which was perfect.  None of my kids dressed up for school (sad!) so I told them I had brought their costumes: sunlight, water, carbon dioxide, glucose, oxygen, and a plant. haha.

2. Worksheet practice:

Worksheet practice throughout the unit, used in whatever order makes sense for that year and how that group of students is progressing.   This is only two of my worksheets.  The others ended up as a mix of things from other sources that are not directly mine, so I'm not putting them on here.  I know I've got others, but they're probably on my work computer (I'm on my home computer right now).  If I find them I'll put them on here, too. 

(Get the worksheet at the bottom of this page)

Worksheet A: Identification
WORKSHEET B: Chemical Formulas
I use this more for my 8th graders who are working on the periodic table and interpreting chemical formulas.  It reinforces what they learned last year and applies their new knowledge to familiar situations. Link for worksheet at the bottom of this page.


3.  WALL-E Day!
from google image search
No, we don't watch the whole movie, although that would be awesome and less planning for me!  But there's no time to do that and it would be a waste when a few clips can aid your discussion quite nicely.  The kids love this class because we get to watch some of WALL-E and understand that it actually has real science in it!

The clips I show (I may or may not show all of them)
       1. Opening Scene
       2. WALL-E's day at work
       3. WALL-E finds a plant
       4. WALL-E first date scene (EVE takes the plant)
       5. WALL-E in space
       6. Human dystopia
       7. Directive A113
       8. End Credits (I show this so we can talk about what the people are doing and how the earth changes)

WORKSHEET FOR WALL-E (link at bottom of page)


4. Yeast Lab:

It's hard to tell, but the red balloon is a little bigger.
It would be fun to also do a plant lab, but I haven't figured out how to do one of those in our small little country school with limited resources.  So yeast lab is how we'll have to do it! The kids love watching the balloons fill up. I use this towards the end of the unit to really push their thinking and application of what they have learned.  Deeper level questions like "How can you prove the yeast are doing respiration and not photosynthesis?" (possible answers: we added sugar as a reactant; they're not green, so they don't have chloroplast; etc.) "What is filling up the balloon and how do you know?" (CO2, because it's undergoing respiration).  My kids have a harder time with these questions that make them think.  It takes more prodding as a teacher to get these SPED kids to that level.  We can get there, it just takes longer.


LAB WORKSHEET (link at bottom of page)


And that's photosynthesis and respiration.  We do a lot of group lecture, discussion, and practice.  I draw a lot on the board and I have them practice the equations every day.  Today was our last day on the unit, but we have two days of review before our cell test (the overall unit), so we'll have some talk on it before the test next week.

Wednesday, October 28, 2015

The Cell Project!

This year I had my students complete a cell project.  I had two weeks of introducing the cell (more like 1.5 weeks with PTC one week), completing sections in our notebooks, and letting them know this project was coming up.  They also had Fall Break in there, and so there was plenty of time to do the project.

Sideways, but this shows one student's pages in her ISN of the cells and her labels. 
Upside down, but this foldable opens up to reveal the name on one side and the function on another side.


I didn't have my students complete a project last year at home, mostly because I was afraid no one would actually do one.  But I let the kids know, I told the parents about it at PTC, I sent home notices about it, and reminded the kids every single day that they had this project.  I was pleasantly surprised with how many kids actually completed one and how well they turned out!  Remember, I teach special education.  Remember, I teach in a poorer area where kids don't have resources and most parents work late into the night.  So this was awesome.

There were still some students who turned it in late, and then I still have a couple who haven't completed it all together.  But we've conferenced and they know they can bring it in at any time (for reduced credit, since it's late; still, it's much better than a 0).

And now, without further ado.... the projects!


This is a cake with candy on it.  The kid forgot to label the parts but quickly completed that after he completed his work that day. 
There were two cakes, and they were beautiful.  Unfortunately I didn't get pictures of the other one before it was cut up and shared with the other students (after receiving a grade, of course!).

These aren't all of the projects, just a sampling.  I'm so proud of my kids.  They did a great job.


Monday, October 26, 2015

Word Wall

It's been a looooong while!  Hopefully I can put up a few posts in the next few days, because we've all been working hard and learning a lot!  I definitely have the pictures to show for it, I just need to post it. 

First up:  Word Wall.

I haven't been totally good at updating this word wall, but what I have updated is totally beautiful (if I do say so myself).  I got this idea from another teacher, who sold her word wall words.  Unfortunately, I'm a brand new teacher who is not ready to buy funds (especially when it's unsure how long I'll actually be teaching this subject--special ed, you know... we change around some times).  Instead, I created my own.  Thus the reason why I've kind of slowed down and need to remember to make more when I go home!

Our first unit for both 7th and 8th: the Scientific Method.

The arrows are supposed to show how the words are connected.  I would cover this up with a sheet whenever we took quizzes, but the kids have been good to use it when they need it.

7th grade Cell unit.  I don't go over all of the organelles, but make sure my kids know the important ones.  By the end of the unit most know these in and out; I'm really proud of my kids.

Monday, May 18, 2015

Frog Dissection


Ah, yes.  That wonderful day in middle school science that everyone remembers.  A right of passage, almost.

The frog dissection.


The last unit in our syllabus was supposed to go over some parts of physiology.  I ran out of time (though some of the points I was able to cover in other units), so I tried to make up for it by explaining what they were looking at during the dissection.  Lame?  Maybe.

I was late to class today.  We had a meeting with the principal that went over time into the next period.  After it ended I had to race to get the trays for the frog dissection, then race to my classroom.  I found the security guard letting them in.  "Oh, please, no.  I have frogs in my classroom and I don't want students in there unaccompanied."  I don't know why you would let students into a classroom without the teacher in there anyway, but I'm glad I got there right as they were entering.  Can you imagine the disaster???

Hypothetical Situation
Student 1:  look!  A bag full of frogs!
Student 2:  Cool!  Let's poke it!
Student 1: Okay!
 . . . poking ensues until the bag is in shambles, liquid spilled on the floor, and frogs are being thrown across the room  . . . 

Yeah. . . I don't want that to happen!!

The students came in and sat down.  I gave a very quick and stern introduction.  There is no horseplay when we have the frog on our tables.  There is no walking around.  There is no waving of the tools.  There is no playing with your frog.  This is your last warning and if I see any of these behaviors you will be sent immediately to the office to spend the remainder of the period.

The kids were pretty good with understanding that they had to be on their best behavior today.  They figured out that I wasn't mad, but good behavior was important today.

It was fun.   Lots of exclamations throughout the period.  I put the lab instructions on the projector for them all to see and we went through the instructions together.  That made it easier for us all to be on the same page rather than having them follow the instructions at their own pace.

Everyone was on good behavior and the dissection went smoothly.

I had two class periods in a row that did this dissection.  By the end of the second the smell was getting to me!!  I had both classroom doors open with the air vents on their highest setting, just to try and get the air circulated well enough.  However, it wasn't until the end when we had cleaned everything up and clorox wiped the tables down that it started to smell better.

Yay for adventures and clean classrooms.

Wednesday, May 13, 2015

7th Grade Final Exam

This was an awesome day.  Every single one of my seventh graders passed this test (so far, that is;  I had 3 kids absent today and two suspended––yikes!).  I had four kids get 100% and many get A's and B's.  I didn't have too many C's and I think I had 3 D's?

But this wasn't an easy test.  I was proud of my kids for doing so well and remember so much material over the past year.  These kids are awesome.

I loved walking around as my kids were taking the test.  I would occasionally read the question for them if they asked (this is sped and I am testing them on their science knowledge and not their reading abilities.  I let them read by themselves if they choose to, but I always read test questions when they ask).  During some instances when I read the question, the student would think about it, then have a happy gasp as they said, "oh, I know this one!"  One kid turned to the third page and a big smile came on his face as he quickly started filling in the answers.

I loved it.  Again, this was not an easy test.  These kids worked really hard this year.  They paid attention and completed their assignments.  I'm really proud of them.

Throughout the year my tests have been challenging.  Some of my students have complained that my tests are long.  And I agree with them.  I'm still learning how to ensure I get both breadth and depth in my exams (especially when covering the entire year) and keep it to one page.  Because I have yet to learn this, I brought in little cookies, and I told the kids that when they were done with half of it, I would put a cookie on their desk for "brain energy."  They seemed to enjoy that.

I had a few polite "Thank You"'s when they received their cook, which I quite appreciated, too.  You don't always get that here.

It was so funny to see the worry on their faces when they turned in the exam.  One girl kept exclaiming to herself, "I think I got a bad grade . . . ?"  I graded the tests during the same class period (again, this is sped––I don't have that many kids in there so I can grade these really fast).  When I returned it to her she saw she had received a 100%. She quietly scanned the page reading the little note I had written her, then raised her hands up with a big celebratory shout.  It was adorable.  She kept look through her test over and over again like she couldn't believe it.

If this was an easy test their victory wouldn't have been as sweet.  I don't give easy tests.  They can do much more than that.


Anyway, this is our seventh grade science final exam.


They all seemed to enjoy the bonus questions.  I had 100% participation on the bonus during this test, which isn't always the case.  I find the bonus questions are motivating because it's a non-threatening way for them to take a chance or a positive way to give extra points for what they've learned.

It was through a bonus question on their first quiz that they learned the term "flagellum."  They all struggled with it (I had only mentioned it a couple of times in class).  Afterwards we worked on it together to discover the answer.  I haven't really mentioned "flagellum" since then, but today after the test when I randomly asked "what's the tail-like structure on the animal cells," my students still remembered. 


Saturday, April 18, 2015

Skeleton Reconstruction Results

My kids did a great job!  They loved this.  This was a really good learning opportunity.  My favorite part was showing them the pelvic bone and the femur and demonstrating how they fit together as a ball-and-socket joint.  That one was a favorite.  What other opportunity do kids get to manipulate real bones?

Just finished.  You can still see the glue still wet on some of them. 


Monday, April 13, 2015

Owl Pellet Skeleton Reconstruction

The last step of our owl pellet lab is here!  (See part 1 and part 2.)

The kids are taking their washed bones and gluing them into a complete skeleton.  For their reference, I'll have the following image on the smart-board for them all to reference throughout the lesson.

Click here for image.

The rubric requires the following things: bones placed correctly, missing bones drawn in, bones labeled correctly, neatly done.  The kids and I will work together beforehand to determine what exceeds expectation, meets expectation, and doesn't meet expectation for each criteria.  

In the end, it will look something like this.  This is my example I did for the kids to look at.  


You can already see there are a few scientific terms I'm not worrying about for my sped kids: mandible (jaw), metacarpals (fingers), metatarsals (toes), innominate (I'm using pelvis instead), and I'm not doing sacrum at all.

This should be lots of fun tomorrow. I'm excited about it. :D

Wednesday, April 8, 2015

Bones, Bones, Analogous Bones.

I loved this lesson.  I felt like it went really well, was engaging, and the kids loved it.

We just finished our owl pellet dissection.  The bones are all out.  The next step is for the kids to organize the bones into a skeleton.  I felt like they would do much better at that if we first learned what a normal skeleton should look like, and cover a few standards in there at the same time.

I also taught them a few new skeleton terms.

Words most of them already knew:  skull, ribs
Words that were new: vertebrae, humerus, radius/ulna, pelvis.
Generic words I used: fingers, leg bones, toes.

To start with:

The Bell Ringer:

Examples of ways the two species were similar are: two legs, two eyes, no hair (it's hot!), long legs (one to run from predators, the other to reach food)
Examples of ways the two species were different:  Island A may have camouflage. Island B may have long neck.


I kept referring back to this throughout the lesson when kids would give me weird looks.  I'll explain as I go.


Here is a human skeleton.  We started by pointing out different parts of the skeleton and having the kids feel for their own bones––feel your ribs, find your sternum, feel your pelvic bones, etc.

I then had a slide with lots of different animals on it: human, raccoon, mouse, bear, bird, whale, snake, fish.

Which of these have a skeleton like the human?

We had a little vote.  It was unanimous for the land mammals to have similar skeletons.  Maybe whale, maybe bird, definitely not snake or fish.

Then I told them that, except for the fish, every single one of the animals on the board had a pelvic bone.  A reminder that the pelvic bone is your hips and your legs are attached to it.  The kids all agree that the human, mouse, bear, raccoon, and bird have a pelvic bone, because they all have legs.  But they didn't really believe me with the snake or the whale.

Next slide: skeleton images of human, mouse, and snake.  Point out the skull.  Point out the vertebrae, point out the ribs.  All three definitely have this.  Then point out the hips.  (I had to have two separate images of the snake skeleton so they could actually see the small hip bones.)

Why in the world, would the snake have hips??  I had some good hypotheses with this one, actually.  Maybe that's how the snake can lift half of itself up before it strikes?

Actually, dear students, it's because the snake used to have legs.  (Now, okay, okay, it wasn't technically a snake when it had legs––it was an entirely different species back then.  That's farther into the theory of evolution than we need to worry about now.)

WHAAAT??

This is one of those times when you go back to the Bell Ringer, and you explain that once upon a time, there were lizard-like animals.  The population got separated somehow––island, mountain, whatever.  And they needed to adapt to their new environment.  In that new environment, they didn't need legs.  If they didn't need them, would their body put in the energy to make those legs?

One thing you must stress during this lesson is that these changes didn't take place within one animal's lifetime.  The changes occur over millions of years!


Anyway, I did the same thing with a new slide of human skeleton, raccoon skeleton, and whale skeleton.

Introduce the infamous picture of comparative anatomy of the arms. 
I didn't actually use this photo, but I used a similar image in our class textbook.
Can I also say that I have always loved the bat's arm???  How awesome are those fingers?

The visual was really good for the kids and solidified their understanding.  They loved the bat just as much as I did.

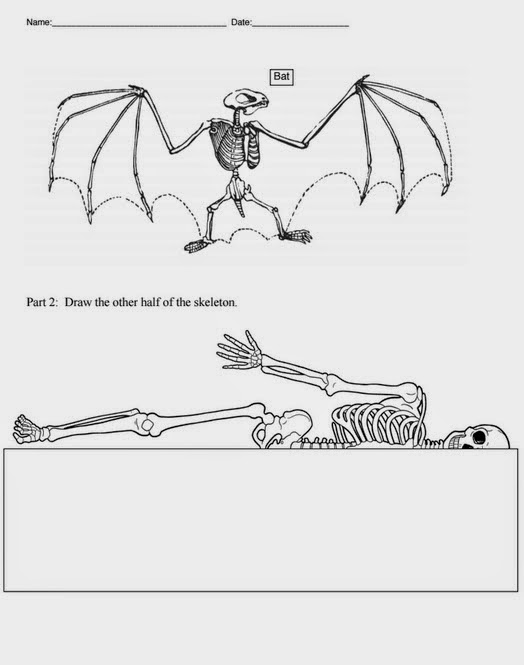
We then went into independent work time. The worksheet was quite simple, but drove home the two objectives I had: (1) learn more about the skeletal anatomy, including new vocabulary words, and (2) understand that comparative anatomy suggests we all descended from a common ancestor.

Oh yeah, and throughout the lesson I talked about how this suggests we all had a common ancestor.  A long, long, long, long time ago, there was the great-great-great-great-great-great-great-great-great-great-great-great- etc. etc. - great grandfather, and from him, we got all of the animals on earth.

Again, tie in the bell ringer.  The skeleton of the two species are going to be the same.  Why would your body put in energy to completely change it when it worked great in the first place?  It might look a little different; for example, a longer neck will mean more vertebrae; but in the end, it's essentially the same skeleton.

Bring in the worksheet: (to download, scroll down to the bottom of the page)


As they did this, I had one group at a time come to our bone cleaning station.  They were to take their bag of bones from the owl pellet lab and clean them all from any left-over dirt and hair.  I'll bleach them   for a little while before our next class, and then we'll start gluing them onto poster paper to make a skeleton image of the diseased pray.

Thus, the worksheet was perfect for our purposes. It solidified our objectives and was simple enough for the kids to complete by themselves with minimal questions asked.  This allowed me to help monitor the bone cleaning station more closely.  Plus, we had music playing in the background, which always makes life more enjoyable.  Successful teaching day.

Monday, April 6, 2015

Owl Pellet Dissection

This was an awesome class.

Have you ever dissected an owl pellet before??

Do you even know what an owl pellet is?  Well, let me inform you.  An owl will swallow it's meal whole, usually.  However, it does not digest everything it eats and the only way for it to get out safely is for the owl to regurgitate it.  Thus, a ball of hair, bones, and saliva are excreted from the owl's mouth.  The pellet.
Owl Pellets for use.  They seem small, but you'd be surprised how many bones you find inside one pellet.

Sounds disgusting, right? Yeah, well, it is if you think to much about it.  I had one of my students put on a permanently disgusted face the whole time I was explaining our task for the day.  But once you get into it you kind of forget what you're working with and just focus on discovering all of the bones in your pellet.

Can I just say that I have never had an entire group of middle schoolers so quiet and captivated for an entire 40-minute period?  They loved it.

Our beginning Bell Ringer.  The writing on the poster was small, so I allowed the kids to come up to the board to get their answers.  The red answers are what they told me after everyone was done.  
One of the posters in our board.  This was a great visual to use.
This dissection was optimally placed in our curriculum.  The kids had just taken a 3-day test and were exhausted.  No one wanted to do any work (teachers included).  So I scheduled our dissection for Thursday––after the test and right before spring break (another reason no one wanted to do any work). In and of itself it is engaging, and there is so much you can learn in a single session.  Plus, the kids are basically discovering and teaching themselves, so all the teacher has to do is facilitate that flow of knowledge.
This was the poster-sized bone chart.  Each partnership also had their own bone chart to use.
All of the posters in the class that day.  Available for students to use and compare their own bones to.  

What you learn in an owl pellet dissection:

  • Lab safety
  • Food Webs––what is the owl eating?
  • Physiology––digestion of owls and bone structure of small rodents.  Also, how many animals can an owl eat at one time?
  • Scientific Inquiry––what animal does this skull belong to and why do I think that?
  • Environmental Factors
  • Ecosystems
  • Evolution –– common descent with bone structures
  • Anything you want 
This can be done in one class period, or you can extend it into an entire interactive project.  I'm going to try and extend this project out. Not only are we done with testing (thus, relaxing the schedule a bit), but this is an engaging project and many students have already asked the next steps, i.e. what are we doing with the bones we've found?

So I'm excited.  The kids are excited.  This is an excellent project for any age.  The pellets are a bit expensive, but believe me when I say they are totally worth it.  TOTALLY.  So worth it that every year our principal buys enough for the entire 7th-grade to do this dissection. 

This video came with the materials, I think.
It was a great 15-minute introduction to Barn Owl life and the Owl Pellet Lab.
Starting the dissection

They split their pellet in two so they could each work on a section.


Very cool discovery––a skull!  A hairy skull, but a skull nonetheless.


One group's pile of bones. 

Saturday, April 4, 2015

The Scientific Method & Bias

The last day of Review week I decided to take all class reviewing the scientific method.  We had just finished our ecology unit, so I didn't want to take time reviewing that again.  There are probably going to be questions on the test dealing with making a hypothesis or conclusion, or evaluating bias, so we needed to spend time on that.

Because the term bias was newer to kids, this was a little slower than the last two days of review.  Basically, this day wasn't review at all, but just test-prep.

Also, notice that each day there is an additional Brain on our worksheet.  Our brains are getting stronger.  Isn't that cute????? :)


Friday, April 3, 2015

Reviewing Heredity

Review Day Two: Heredity.

This covered 2 months worth of material.

sexual/asexual reproduction
inherited vs. acquired traits
dominant and recessive traits
karyotypes
a little bit of natural selection mixed in there, too.

The kids did well on this, though not as well as cells. But there was still many good answers and good energy in the classroom.

Click here for the review worksheet.