Showing posts with label Worksheets. Show all posts

Monday, November 16, 2015

Separating Mixtures

In follow up to our lessons on elements, compounds, and mixtures, we talk about how we can separate mixtures.  Our curriculum requires us to teach 4 different separation techniques: filtration, evaporation, magnetism, and screening.

The first day I introduce this, I give small demonstrations of each one. 
  • I make a mixture of salt water and have that boiling throughout the lesson until it's all gone and only the salt is left.  
  • I have a screen and put a mixture of rocks and dirt through it.  
  • I have a filter and put some stuff through it. 
  • And then this year another teacher let me borrow her mixture of iron filings and sand with her magnet, so we got to show the kids that one as well.  (I also took the kids outside and showed them that the magnet will pick up the iron in the dirt.  One kid came back the next day and said he tried that in his backyard and it worked. Happiness.)
We don't spend much time on this, so there's just a few activities plus a couple of worksheets.  Here's the worksheet I created for this:

Click below for worksheet


Monday, November 9, 2015

Photosynthesis and Respiration

This is a great unit with my seventh graders.  It's easy to start because the kids usually remember something about photosynthesis from elementary school.  If not, they already know that plants need sunlight and water.  This is not a very long unit.  Maybe 2-3 weeks.

The goals for this unit are:
  • The students will be able to write the word equations for photosynthesis and respiration
    • Photosynthesis is
      "sunlight + water + carbon dioxide --> glucose + oxygen."  
    • Respiration is
      "glucose + oxygen --> ATP energy + water + carbon dioxide."
  • The students will identify that photosynthesis occurs in the chloroplast and respiration occurs in the mitochondria
  • The students will identify that they are reverse/opposite reactions.
  • The students will understand the words "reactant" and "product."
  • The students will use their knowledge of the reactions to answer various questions.
Some (not all) of the activities we do for this unit:

1. Acting it out!

I have little cut outs from card stock paper (nothing fancy!) and one kid is assigned a role (either a reactant or a product, or the plant).  I make up a little narrative and the kids have to listen for their part and come in and "act" it out appropriately.  It's just a fun little activity, but it gets the kids up and moving and helps them visualize what's going on.

This class actually happened on Halloween this year, which was perfect.  None of my kids dressed up for school (sad!) so I told them I had brought their costumes: sunlight, water, carbon dioxide, glucose, oxygen, and a plant. haha.

2. Worksheet practice:

Worksheet practice throughout the unit, used in whatever order makes sense for that year and how that group of students is progressing.   This is only two of my worksheets.  The others ended up as a mix of things from other sources that are not directly mine, so I'm not putting them on here.  I know I've got others, but they're probably on my work computer (I'm on my home computer right now).  If I find them I'll put them on here, too. 

(Get the worksheet at the bottom of this page)

Worksheet A: Identification
WORKSHEET B: Chemical Formulas
I use this more for my 8th graders who are working on the periodic table and interpreting chemical formulas.  It reinforces what they learned last year and applies their new knowledge to familiar situations. Link for worksheet at the bottom of this page.


3.  WALL-E Day!
from google image search
No, we don't watch the whole movie, although that would be awesome and less planning for me!  But there's no time to do that and it would be a waste when a few clips can aid your discussion quite nicely.  The kids love this class because we get to watch some of WALL-E and understand that it actually has real science in it!

The clips I show (I may or may not show all of them)
       1. Opening Scene
       2. WALL-E's day at work
       3. WALL-E finds a plant
       4. WALL-E first date scene (EVE takes the plant)
       5. WALL-E in space
       6. Human dystopia
       7. Directive A113
       8. End Credits (I show this so we can talk about what the people are doing and how the earth changes)

WORKSHEET FOR WALL-E (link at bottom of page)


4. Yeast Lab:

It's hard to tell, but the red balloon is a little bigger.
It would be fun to also do a plant lab, but I haven't figured out how to do one of those in our small little country school with limited resources.  So yeast lab is how we'll have to do it! The kids love watching the balloons fill up. I use this towards the end of the unit to really push their thinking and application of what they have learned.  Deeper level questions like "How can you prove the yeast are doing respiration and not photosynthesis?" (possible answers: we added sugar as a reactant; they're not green, so they don't have chloroplast; etc.) "What is filling up the balloon and how do you know?" (CO2, because it's undergoing respiration).  My kids have a harder time with these questions that make them think.  It takes more prodding as a teacher to get these SPED kids to that level.  We can get there, it just takes longer.


LAB WORKSHEET (link at bottom of page)


And that's photosynthesis and respiration.  We do a lot of group lecture, discussion, and practice.  I draw a lot on the board and I have them practice the equations every day.  Today was our last day on the unit, but we have two days of review before our cell test (the overall unit), so we'll have some talk on it before the test next week.

Wednesday, May 13, 2015

7th Grade Final Exam

This was an awesome day.  Every single one of my seventh graders passed this test (so far, that is;  I had 3 kids absent today and two suspended––yikes!).  I had four kids get 100% and many get A's and B's.  I didn't have too many C's and I think I had 3 D's?

But this wasn't an easy test.  I was proud of my kids for doing so well and remember so much material over the past year.  These kids are awesome.

I loved walking around as my kids were taking the test.  I would occasionally read the question for them if they asked (this is sped and I am testing them on their science knowledge and not their reading abilities.  I let them read by themselves if they choose to, but I always read test questions when they ask).  During some instances when I read the question, the student would think about it, then have a happy gasp as they said, "oh, I know this one!"  One kid turned to the third page and a big smile came on his face as he quickly started filling in the answers.

I loved it.  Again, this was not an easy test.  These kids worked really hard this year.  They paid attention and completed their assignments.  I'm really proud of them.

Throughout the year my tests have been challenging.  Some of my students have complained that my tests are long.  And I agree with them.  I'm still learning how to ensure I get both breadth and depth in my exams (especially when covering the entire year) and keep it to one page.  Because I have yet to learn this, I brought in little cookies, and I told the kids that when they were done with half of it, I would put a cookie on their desk for "brain energy."  They seemed to enjoy that.

I had a few polite "Thank You"'s when they received their cook, which I quite appreciated, too.  You don't always get that here.

It was so funny to see the worry on their faces when they turned in the exam.  One girl kept exclaiming to herself, "I think I got a bad grade . . . ?"  I graded the tests during the same class period (again, this is sped––I don't have that many kids in there so I can grade these really fast).  When I returned it to her she saw she had received a 100%. She quietly scanned the page reading the little note I had written her, then raised her hands up with a big celebratory shout.  It was adorable.  She kept look through her test over and over again like she couldn't believe it.

If this was an easy test their victory wouldn't have been as sweet.  I don't give easy tests.  They can do much more than that.


Anyway, this is our seventh grade science final exam.


They all seemed to enjoy the bonus questions.  I had 100% participation on the bonus during this test, which isn't always the case.  I find the bonus questions are motivating because it's a non-threatening way for them to take a chance or a positive way to give extra points for what they've learned.

It was through a bonus question on their first quiz that they learned the term "flagellum."  They all struggled with it (I had only mentioned it a couple of times in class).  Afterwards we worked on it together to discover the answer.  I haven't really mentioned "flagellum" since then, but today after the test when I randomly asked "what's the tail-like structure on the animal cells," my students still remembered. 


Monday, May 11, 2015

8th Grade Final Exam

It's been a while.  But I feel the end of the year is like that.  I'm not really going over anything new, we're just reviewing everything we've already done.  And then there are a lot of activities and meetings towards the end of the year.

Does anyone else feel like the end of the year is both a drag (still 3 more weeks left??) and a sprint to the finish (only 3 more weeks left??)?

Today my eighth graders took their final exam.  My first class left me very pleased with the results.  More than half the class received A's and B's.  That's awesome.  I don't give easy tests and I expect a lot.  So I was very pleased.

My second class was not as good. Only one kid passed, and he passed with a 95%.  How can there be that much difference?  This class is hard to control, they're often yelling at each other, and don't always try their best.  Even during the exam they were asking why they couldn't take notes (um, you don't even have any??) because "all" of the other classes let them use notes.  Well, looking from experience, I've never let you use notes on a test, so why would I let you use notes now?  I want to see how much you have learned, not how well you can take and read your notes.  Needless to say this second period was difficult and hard.  I don't think I'm entirely to blame, but I do have a lot of notes on how I'm going to improve next year.

After all, I'm a brand new teacher.  There is much room for improvement.

Here's my copy of the eighth grade exam.  I was quite pleased with it.  :)


How well would you do on an eighth grade science test?


Friday, April 24, 2015

Explain the Forces

The first day I introduced forces, I also did this worksheet with the kids. We all discussed it together to come up with the answer.  I would write the answer down on my paper that the kids could see on the projector, and they would also write the answer down on their papers.  The last part I had them do themselves.  It's a pretty self-explanatory worksheet, so you can let your kiddos do it on their own if you want.  My reasoning for doing it with them was to have a little more guided practice to let them become confident in the idea before they did their own worksheet.

Again, disclaimer: This is not mine!  I found this on one of those wonderful teaching websites with free worksheets, but I wasn't good enough to trace my sources so I can't link you to the original website.

Get the worksheet at the bottom of the page.


I had a few kids telling me that was their car, and asking how I got a picture of it. :P

Thursday, April 23, 2015

What is a Force?

I have loved this unit with the 8th graders.  There's something concrete about this idea that the kids can really hold on to.

To start out this unit, I first introduced the fact that
a force has both magnitude and direction.

I started out by holding a book up in front of me, then quickly letting go and catching it again lower down.

Question:  Why does it fall?
Answer: Gravity.
Question: Gravity is doing what to the book?
Answer: pulling it down.

Okay, so now we know that there is a force of gravity with some magnitude in the direction towards the ground.

Now the book is placed on a table.

Question: Is there still gravity on this book?

I got some weird looks with that.   . . . . . No?  . . .  Yes? . . . . I don't really know, but I think so, but it's not moving down. . . .?????

When the kids say "no," my eyes get real big and I say, "What?? There is no gravity anymore??"  And the kids say "okay, yeah, there is."

Question:  Then why is the book not falling down?
Answer: Because the table is in the way.

Oh!

Introduce this image on the smart board:


So we know there's gravity pulling it down. (Draw downward arrow).  But the book isn't falling through the table, so the table must be pushing up on the book. (Draw upward arrow).


HuUh??!?

Yes.  The table is pushing up on the book.  At this point you take the book back into your hands.

Question: Am I holding the book up with a force?
Answer: Yes.
Question: Then doesn't it make sense that the table also has to hold the book up with a force?
Answer: I guess so.

Then you do a whole bunch of other examples demonstrating the forces and which direction they are going. Examples can be cars, balloons, something falling (this was done to introduce the idea of air resistance), other things sitting motionless.

Now you introduce the idea that you can combine forces to find a net force.


SCENARIO 1

Here's a wonderful little picture analogy.  I chose a girl in the class to be the first person.  Sammy* (*names has been changed) is driving along the road when suddenly she runs out of gas.  She gets out and sees a gas station at the end of the road so tries to push her car.  But the car is too heavy for her to push and it won't budge.  She calls her friend (motion to Sammy for her to give her desired friend's name), Brittany*.  Brittany comes and tries to help, but they are both still not strong enough to push the car.  They then call a third friend (motion again for them to choose a third comrade) who comes and they all push with all their might.  They're finally able to get the car rolling.

Truth:
Students are more likely to listen when you use their name for an analogy.

Kids can easily see that because there are three people there is more force and the car will move.

Do lots of examples like this where you practice adding the forces, stressing that the forces are all going the same direction so you can add them.  Your answer must have both magnitude and direction.  I don't want "24N".  I want "24N ->"


SCENARIO 2

Tug-of-War.  Who doesn't love a good tug-of-war?

Team A is pulling with a combined force of 20N <-- to the left.  Team B is pulling with a combined force of 30N --> to the right.  

Question: Are the teams pulling in the same direction, or in the opposite direction?
Answer: Opposite direction.
Question: So do you think we're going to add their forces or subtract their forces?
Answer: subtract.

The net force is 10N --> to the right. 

Question: Why is the rope going to the right?
 .. . . pause while students try to figure this out . . 
timid student answer: because the team on the right is stronger?

YAY!  (remember that this is SPED, so kids need time to process answers). 

More tug-of-war examples with net forces to the right, to the left, and a net force of 0.

More examples like this on the board where both I model and the kids practice as a group:

Remember, the answer is 4N -->, not just 4N.

Independent Practice

Disclaimer, this is not my worksheet.  I found this fabulous worksheet online that I thought was just perfect for what we were doing.  I don't remember what website I got it off of, but it was one of those great teaching resource websites with free worksheets.  

To get worksheet, click here.

I printed the first two pages double sided for this day.  I printed pages 3-4 for another day to keep up practice.


Wednesday, April 8, 2015

Bones, Bones, Analogous Bones.

I loved this lesson.  I felt like it went really well, was engaging, and the kids loved it.

We just finished our owl pellet dissection.  The bones are all out.  The next step is for the kids to organize the bones into a skeleton.  I felt like they would do much better at that if we first learned what a normal skeleton should look like, and cover a few standards in there at the same time.

I also taught them a few new skeleton terms.

Words most of them already knew:  skull, ribs
Words that were new: vertebrae, humerus, radius/ulna, pelvis.
Generic words I used: fingers, leg bones, toes.

To start with:

The Bell Ringer:

Examples of ways the two species were similar are: two legs, two eyes, no hair (it's hot!), long legs (one to run from predators, the other to reach food)
Examples of ways the two species were different:  Island A may have camouflage. Island B may have long neck.


I kept referring back to this throughout the lesson when kids would give me weird looks.  I'll explain as I go.


Here is a human skeleton.  We started by pointing out different parts of the skeleton and having the kids feel for their own bones––feel your ribs, find your sternum, feel your pelvic bones, etc.

I then had a slide with lots of different animals on it: human, raccoon, mouse, bear, bird, whale, snake, fish.

Which of these have a skeleton like the human?

We had a little vote.  It was unanimous for the land mammals to have similar skeletons.  Maybe whale, maybe bird, definitely not snake or fish.

Then I told them that, except for the fish, every single one of the animals on the board had a pelvic bone.  A reminder that the pelvic bone is your hips and your legs are attached to it.  The kids all agree that the human, mouse, bear, raccoon, and bird have a pelvic bone, because they all have legs.  But they didn't really believe me with the snake or the whale.

Next slide: skeleton images of human, mouse, and snake.  Point out the skull.  Point out the vertebrae, point out the ribs.  All three definitely have this.  Then point out the hips.  (I had to have two separate images of the snake skeleton so they could actually see the small hip bones.)

Why in the world, would the snake have hips??  I had some good hypotheses with this one, actually.  Maybe that's how the snake can lift half of itself up before it strikes?

Actually, dear students, it's because the snake used to have legs.  (Now, okay, okay, it wasn't technically a snake when it had legs––it was an entirely different species back then.  That's farther into the theory of evolution than we need to worry about now.)

WHAAAT??

This is one of those times when you go back to the Bell Ringer, and you explain that once upon a time, there were lizard-like animals.  The population got separated somehow––island, mountain, whatever.  And they needed to adapt to their new environment.  In that new environment, they didn't need legs.  If they didn't need them, would their body put in the energy to make those legs?

One thing you must stress during this lesson is that these changes didn't take place within one animal's lifetime.  The changes occur over millions of years!


Anyway, I did the same thing with a new slide of human skeleton, raccoon skeleton, and whale skeleton.

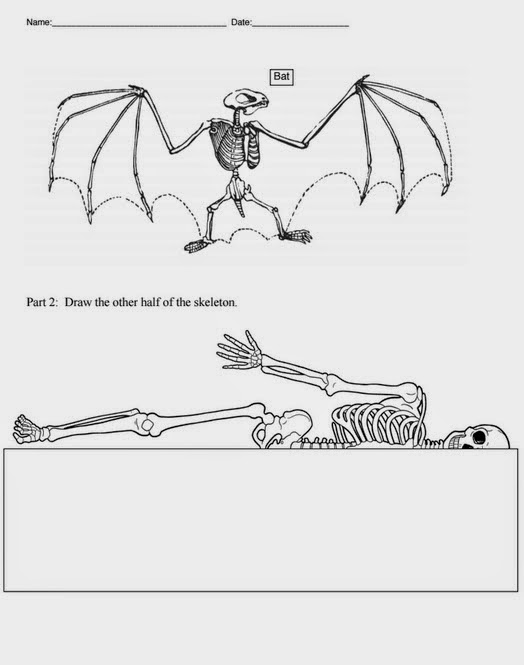
Introduce the infamous picture of comparative anatomy of the arms. 
I didn't actually use this photo, but I used a similar image in our class textbook.
Can I also say that I have always loved the bat's arm???  How awesome are those fingers?

The visual was really good for the kids and solidified their understanding.  They loved the bat just as much as I did.

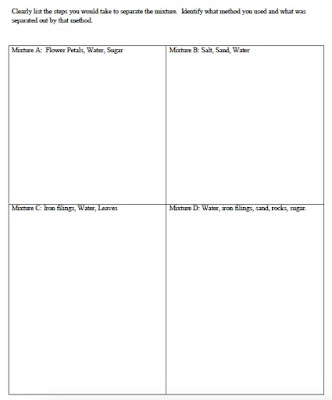
We then went into independent work time. The worksheet was quite simple, but drove home the two objectives I had: (1) learn more about the skeletal anatomy, including new vocabulary words, and (2) understand that comparative anatomy suggests we all descended from a common ancestor.

Oh yeah, and throughout the lesson I talked about how this suggests we all had a common ancestor.  A long, long, long, long time ago, there was the great-great-great-great-great-great-great-great-great-great-great-great- etc. etc. - great grandfather, and from him, we got all of the animals on earth.

Again, tie in the bell ringer.  The skeleton of the two species are going to be the same.  Why would your body put in energy to completely change it when it worked great in the first place?  It might look a little different; for example, a longer neck will mean more vertebrae; but in the end, it's essentially the same skeleton.

Bring in the worksheet: (to download, scroll down to the bottom of the page)


As they did this, I had one group at a time come to our bone cleaning station.  They were to take their bag of bones from the owl pellet lab and clean them all from any left-over dirt and hair.  I'll bleach them   for a little while before our next class, and then we'll start gluing them onto poster paper to make a skeleton image of the diseased pray.

Thus, the worksheet was perfect for our purposes. It solidified our objectives and was simple enough for the kids to complete by themselves with minimal questions asked.  This allowed me to help monitor the bone cleaning station more closely.  Plus, we had music playing in the background, which always makes life more enjoyable.  Successful teaching day.

Saturday, April 4, 2015

The Scientific Method & Bias

The last day of Review week I decided to take all class reviewing the scientific method.  We had just finished our ecology unit, so I didn't want to take time reviewing that again.  There are probably going to be questions on the test dealing with making a hypothesis or conclusion, or evaluating bias, so we needed to spend time on that.

Because the term bias was newer to kids, this was a little slower than the last two days of review.  Basically, this day wasn't review at all, but just test-prep.

Also, notice that each day there is an additional Brain on our worksheet.  Our brains are getting stronger.  Isn't that cute????? :)


Friday, April 3, 2015

Reviewing Heredity

Review Day Two: Heredity.

This covered 2 months worth of material.

sexual/asexual reproduction
inherited vs. acquired traits
dominant and recessive traits
karyotypes
a little bit of natural selection mixed in there, too.

The kids did well on this, though not as well as cells. But there was still many good answers and good energy in the classroom.

Click here for the review worksheet.


Thursday, April 2, 2015

Reviewing Cells

Two weeks ago my 7th graders and I engaged in a week-long intense review of everything we had studied this year.  The reason:  7th grade Standards Based Assessment in science was the following Monday.

Day one: Cells

Everything about cells

Plant/Animal Cell Structure and Function
Unicellular/Multicellular
6 Characteristics of Living Things
Biotic/Abiotic
Mitosis
Photosynthesis
Cellular Respiration

That's about 3 months worth of material that we went over in one day, and I was wondering how my kids would do.

Answer: AWESOME!  My kids did SO well on this review and it really made me so proud as a teacher.  The only thing they had trouble with was unicellular/multicellular, but we never spent much time on that and they're big words and if you have a learning disability and can't read very well in the first place then big words like that will scare you off.  Yeah.

We spent half of the class going over everything and then I gave them the other half to complete the review worksheet, which can be downloaded at the bottom of this page.


Thursday, March 19, 2015

Electricity Quiz

Electricity has been a really short unit.  My kids have enjoyed it.  I don't know if they fully understand the concept of electricity, but they know series and parallel and whether or not the light bulb is receiving electricity or not.  That good, right???

We're going to do a final review day.  We're going over all of the concepts and then they'll take this little quiz that they can use their notes on.  At the end, we'll also do a little review on our light/sound unit for those who want to retake the test next week.  If there's time we'll start learning about magnetism!  ooooh.  Exciting.

I hope it goes well.  I have had a lot of problems with behavior recently, resulting in one of my students being place in ISS (in-school suspension).  One other student probably also should have been place in ISS, but hasn't been.  We'll see what happens tomorrow.  So because of all of the problems, I'm not quite sure if the kids got all of these concepts like they should have.  Well, we're going to review and then I'll see how they do.

Here's the quiz.  It's meant to be printed double sided and cut in half.


Here are the quiz answers


Wednesday, March 18, 2015

Series or Parallel Circuits

This should have gone before my last post, but I'm not going to worry about it.  There are too many papers on my desk to worry about any kind of order in my life!!

Occasionally I try to organize my desk.

Occasionally the occasional organization project is actually successful.

So we can't expect my blog to be that much more organized!

Okay, here is the worksheet I had for my series and parallel class.  Our lesson was to be able to tell the difference between the two (series has one path for the electricity to flow, whereas parallel has two or more paths).  We went through multiple examples where the students had to show with their fingers how many paths there were.  Once everyone had the correct number of fingers, I asked them if that made it series or parallel.

We also had to be able to tell if the light bulbs would turn on.  If one is broken, what happens to the others?  If switch A is open, but switch B is closed, which light bulbs are on and which are off?

Lots of fun.

I like this kind of stuff because my mind loves puzzles.


Tuesday, March 17, 2015

Electric Circuits

On of the great memories I have from middle school science is learning about electric circuits. We would go to the lab room and get to fiddle around with all of the wires, batteries, light-bulbs, and whatever else there was at our disposal.  I knew when I got to this unit, that I would have to let my kids enjoy the same experimental freedom.  There is more power in doing the science than in reading about it.

For this unit, I always have a little lesson at the beginning, then sometimes a little worksheet to make sure they are understanding.  Afterwards, they have their little experiment they have to do.  If they are done, I let them play around with the materials before the end of class.

Oooh . . Science!
Apologies for my lame phone picture quality

We have done the following experiments:

1. Conductors and Insulators –DAY 1
2. Build a simple circuit –DAY 2

  • Materials:
    • A battery (no battery holders), 
    • A free light bulb, 
    • simple wires (no alligator clips) 
  • Make the light bulb turn on, then draw your circuit and label the following:
    • Conductor
    • Insulator
    • Power Source
    • Light Bulb 
      • (the gen-ed classes labeled this as "resistor."  I did not worry about that term with my kids. I wanted them to focus on "conductor" and "insulator" and understanding how a circuit works.)
3. Build a working series circuit –DAY 3
    Build a working parallel circuit –DAY 3
  • Materials:
    • 2 batteries (with battery holders)
    • 2 light bulbs
    • wires (with alligator clips)
    • 1 switch
  • Make the light bulbs turn on, then draw your circuits and label the following in each circuit
    • Conductor
    • Insulator
    • Power Source
    • Light Bulb **see note above
    • Switch
5. Exploration with series and parallel circuits –DAY 4
  • The lesson I had at the beginning of this class was two fold: review series and parallel circuits and practice drawing circuits correctly using symbols.  We used the mini white boards for this lesson so each kid could practice drawing the circuit instead of just watching me draw it. 
  • For this experiment I wanted them to continue solidifying series and parallel circuits and to play around with the variables in a circuit.  How do you get a light bulb brighter? What happens when you have a lot of wires?  I had them follow this worksheet to get going.  The kids could go at their own pace on this one, which is what I loved about it.  For those who finished fast, I had a challenge circuit for them to build for extra credit.